Module Title: ACLs for IPv4 Configuration Module Objective: Implement IPv4 ACLs to filter traffic and secure administrative access.
| Topic Title | Topic Objective |
| Configure Standard IPv4 ACLs | Configure standard IPv4 ACLs to filter traffic to meet networking requirements. |
| Modify IPv4 ACLs | Use sequence numbers to edit existing standard IPv4 ACLs. |
| Secure VTY Ports with a Standard IPv4 ACL | Configure a standard ACL to secure VTY access. |
| Configure Extended IPv4 ACLs | Configure extended IPv4 ACLs to filter traffic according to networking requirements. |
Configure Standard IPv4 ACLs
Create an ACL
All access control lists (ACLs) must be planned. When configuring a complex ACL, it is suggested that you:
- Use a text editor and write out the specifics of the policy to be implemented.
- Add the IOS configuration commands to accomplish those tasks.
- Include remarks to document the ACL.
- Copy and paste the commands onto the device.
- Always thoroughly test an ACL to ensure that it correctly applies the desired policy.
Numbered Standard IPv4 ACL Syntax
To create a numbered standard ACL, use the access-list command. ![]()
| Parameter | Description |
| access-list-number | Number range is 1 to 99 or 1300 to 1999 |
| deny | Denies access if the condition is matched |
| permit | Permits access if the condition is matched |
| remark text | (Optional) text entry for documentation purposes |
| source | Identifies the source network or host address to filter |
| source-wildcard | (Optional) 32-bit wildcard mask that is applied to the source |
| log | (Optional) Generates and sends an informational message when the ACE is matched |
Note: Use the no access-list access-list-number global configuration command to remove a numbered standard ACL.
Named Standard IPv4 ACL Syntax
To create a named standard ACL, use the ip access-list standard command.
- ACL names are alphanumeric, case sensitive, and must be unique.
- Capitalizing ACL names is not required but makes them stand out when viewing the running-config output.
![]()

Apply a Standard IPv4 ACL
After a standard IPv4 ACL is configured, it must be linked to an interface or feature.
- The ip access-group command is used to bind a numbered or named standard IPv4 ACL to an interface.
- To remove an ACL from an interface, first enter the no ip access-group interface configuration command.
![]()
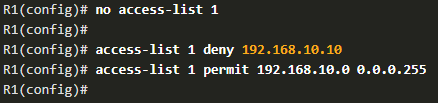
Numbered Standard ACL Example

 The example ACL permits traffic from host 192.168.10.10 and all hosts on the 192.168.20.0/24 network out interface serial 0/1/0 on router R1.
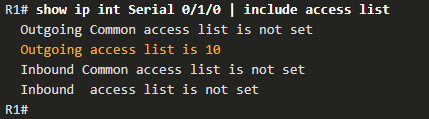
- Use the show running-config command to review the ACL in the configuration.
- Use the show ip interface command to verify the ACL is applied to the interface.
Named Standard ACL Example
The example ACL permits traffic from host 192.168.10.10 and all hosts on the 192.168.20.0/24 network out interface serial 0/1/0 on router R1. 

- Use the show access-list command to review the ACL in the configuration.

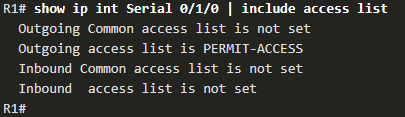
- Use the show ip interface command to verify the ACL is applied to the interface.
Modify IPv4 ACLs
Two Methods to Modify an ACL
After an ACL is configured, it may need to be modified. ACLs with multiple ACEs can be complex to configure. Sometimes the configured ACE does not yield the expected behaviors. There are two methods to use when modifying an ACL:
-
-
- Use a text editor.
- Use sequence numbers.
-
Text Editor Method
ACLs with multiple ACEs should be created in a text editor. This allows you to plan the required ACEs, create the ACL, and then paste it into the router interface. It also simplifies the tasks to edit and fix an ACL. To correct an error in an ACL:
- Copy the ACL from the running configuration and paste it into the text editor.
- Make the necessary edits or changes.
- Remove the previously configured ACL on the router.

- Copy and paste the edited ACL back to the router.
Sequence Number Method
 An ACL ACE can be deleted or added using the ACL sequence numbers.
- Use the ip access-list standard command to edit an ACL.
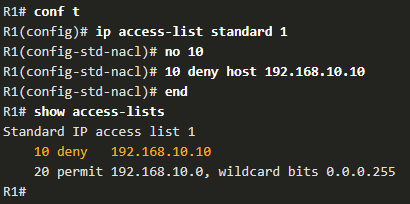
- Statements cannot be overwritten using an existing sequence number. The current statement must be deleted first with the no 10 command. Then the correct ACE can be added using sequence number.
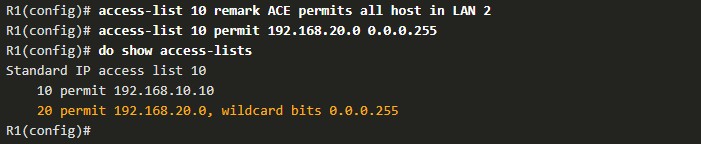
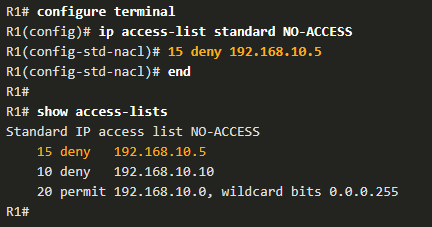
Modify a Named ACL Example
Named ACLs can also use sequence numbers to delete and add ACEs. In the example an ACE is added to deny hosts 192.168.10.11. 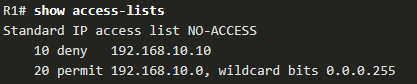
ACL Statistics
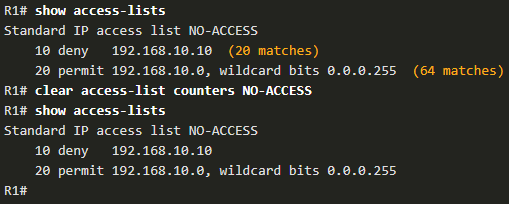
The show access-lists command in the example shows statistics for each statement that has been matched.
- The deny ACE has been matched 20 times and the permit ACE has been matched 64 times.
- Note that the implied deny any statement does not display any statistics. To track how many implicit denied packets have been matched, you must manually configure the deny any command.
- Use the clear access-list counters command to clear the ACL statistics.
Secure VTY Ports with a Standard IPv4 ACL
The access-class Command
A standard ACL can secure remote administrative access to a device using the vty lines by implementing the following two steps:
- Create an ACL to identify which administrative hosts should be allowed remote access.
- Apply the ACL to incoming traffic on the vty lines.
![]()
Secure VTY Access Example
This example demonstrates how to configure an ACL to filter vty traffic.
- First, a local database entry for a user ADMIN and password class is configured.
- The vty lines on R1 are configured to use the local database for authentication, permit SSH traffic, and use the ADMIN-HOST ACL to restrict traffic.

Verify the VTY Port is Secured
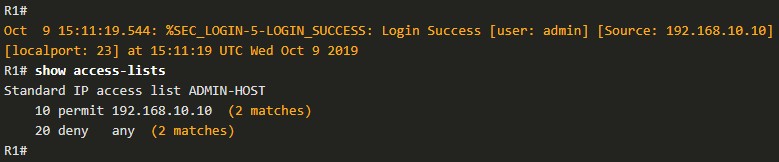
After an ACL to restrict access to the vty lines is configured, it is important to verify it works as expected. To verify the ACL statistics, issue the show access-lists command.
- The match in the permit line of the output is a result of a successful SSH connection by host with IP address 192.168.10.10.
- The match in the deny statement is due to the failed attempt to create a SSH connection from a device on another network.
Configure Extended IPv4 ACLs
Extended ACLs
Extended ACLs provide a greater degree of control. They can filter on source address, destination address, protocol (i.e., IP, TCP, UDP, ICMP), and port number. Extended ACLs can be created as:
- Numbered Extended ACL – Created using the access-list access-list-number global configuration command.
- Named Extended ACL – Created using the ip access-list extended access-list- name.
Protocols and Ports
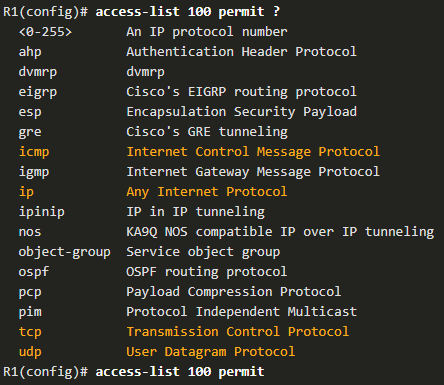
Extended ACLs can filter on internet protocols and ports. Use the? to get help when entering a complex ACE. The four highlighted protocols are the most popular options.
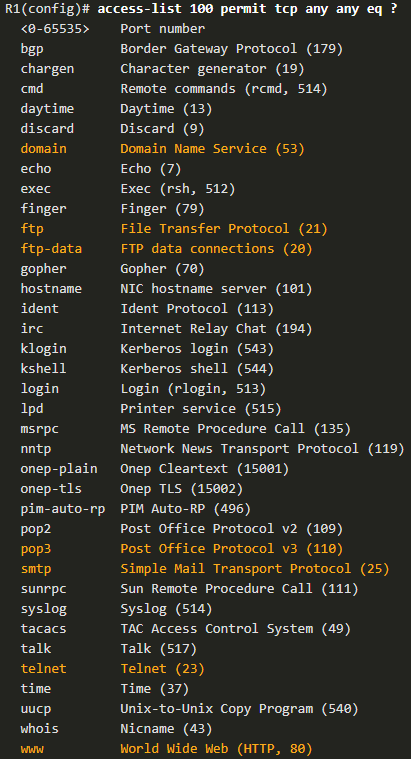
Selecting a protocol influences port options. Many TCP port options are available, as shown in the output.
Protocols and Port Numbers Configuration Examples
Extended ACLs can filter on different port number and port name options. 
 This example configures an extended ACL 100 to filter HTTP traffic. The first ACE uses the www port name. The second ACE uses the port number 80. Both ACEs achieve exactly the same result. Configuring the port number is required when there is not a specific protocol name listed such as SSH (port number 22) or an HTTPS (port number 443), as shown in the next example.
Apply a Numbered Extended IPv4 ACL
In this example, the ACL permits both HTTP and HTTPS traffic from the 192.168.10.0 network to go to any destination. Extended ACLs can be applied in various locations. However, they are commonly applied close to the source. Here ACL 110 is applied inbound on the R1 G0/0/0 interface. 
TCP Established Extended ACL
TCP can also perform basic stateful firewall services using the TCP established keyword.
- The established keyword enables inside traffic to exit the inside private network and permits the returning reply traffic to enter the inside private network.
- TCP traffic generated by an outside host and attempting to communicate with an inside host is denied.

- ACL 120 is configured to only permit returning web traffic to the inside hosts. The ACL is then applied outbound on the R1 G0/0/0 interface.
- The show access-lists command shows that inside hosts are accessing the secure web resources from the internet.
Note: A match occurs if the returning TCP segment has the ACK or reset (RST) flag bits set, indicating that the packet belongs to an existing connection. 
Named Extended IPv4 ACL Syntax
Naming an ACL makes it easier to understand its function. To create a named extended ACL, use the ip access-list extended configuration command. In the example, a named extended ACL called NO-FTP-ACCESS is created and the prompt changed to named extended ACL configuration mode. ACE statements are entered in the named extended ACL sub configuration mode. ![]()
![]()
Named Extended IPv4 ACL Example
The topology below is used to demonstrate configuring and applying two named extended IPv4 ACLs to an interface:
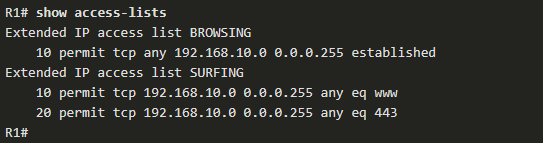
- SURFING – This will permit inside HTTP and HTTPS traffic to exit to the internet.
- BROWSING – This will only permit returning web traffic to the inside hosts while all other traffic exiting the R1 G0/0/0 interface is implicitly denied.
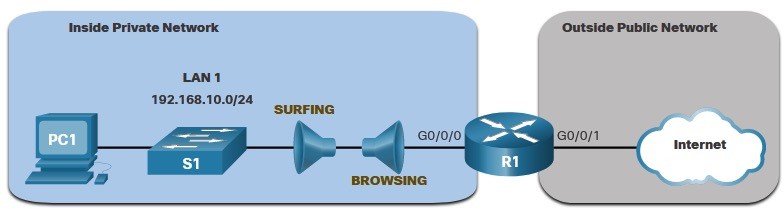

- The SURFING ACL permits HTTP and HTTPS traffic from inside users to exit the G0/0/1 interface connected to the internet. Web traffic returning from the internet is permitted back into the inside private network by the BROWSING ACL.
- The SURFING ACL is applied inbound and the BROWSING ACL is applied outbound on the R1 G0/0/0 interface.
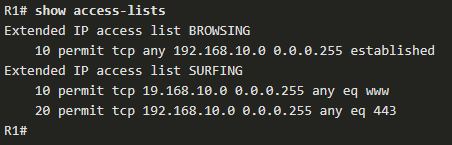
The show access-lists command is used to verify the ACL statistics. Notice that the permit secure HTTPS counters (i.e., eq 443) in the SURFING ACL and the return established counters in the BROWSING ACL have increased. 
Edit Extended ACLs
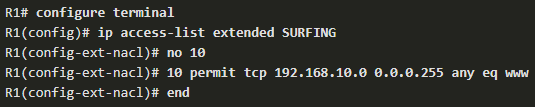
An extended ACL can be edited using a text editor when many changes are required. Or, if the edit applies to one or two ACEs, then sequence numbers can be used. Example:
- The ACE sequence number 10 in the SURFING ACL has an incorrect source IP networks address.
- To correct this error the original statement is removed with the no sequence_#
command and the corrected statement is added replacing the original statement.
- The show access-lists command output verifies the configuration change.
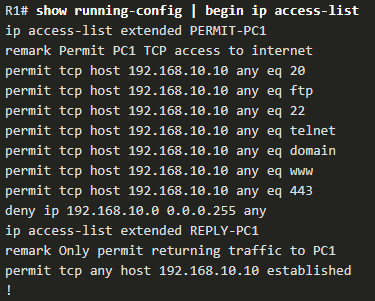
Another Extended IPv4 ACL Example
Two named extended ACLs will be created:
- PERMIT-PC1 – This will only permit PC1 TCP access to the internet and deny all other hosts in the private network.
- REPLY-PC1 – This will only permit specified returning TCP traffic to PC1 implicitly deny all other traffic.


- The PERMIT-PC1 ACL permits PC1 (192.168.10.10) TCP access to the FTP, SSH, Telnet, DNS , HTTP, and HTTPS traffic.
- The REPLY-PC1 ACL will permit return traffic to PC1.
- The PERMIT-PC1 ACL is applied inbound and the REPLY-PC1 ACL applied outbound on the R1 G0/0/0 interface.

Verify Extended ACLs
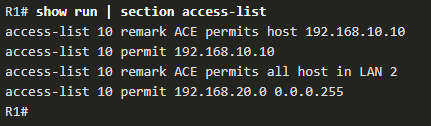
The show ip interface command is used to verify the ACL on the interface and the direction in which it was applied. The show access-lists command can be used to confirm that the ACLs work as expected. The command displays statistic counters that increase whenever an ACE is matched. Note: Traffic must be generated to verify the operation of the ACL.  The show running-config command can be used to validate what was configured. The command also displays configured remarks.